
Foreword: The information society has brought people a lot of information; on one side we enjoy endless information, on the other side we also feel a bit lost: how can we quickly and accurately filter the useful information from all the information the internet provides? The IT elites need to solve this problem urgently.
The emergence of full-text searching technology provides powerful tools to solve the information retrieval problem: Apache Solr is one of those tools.
This article deals with many aspects of Apache Solr „“ feel free to take a quick break from reading this blog occasionally and start practicing on your own! We“™re sure that this can help you in getting an even more comprehensive understanding of Apache Solr.
In this article, we will talk about how to install the latest version of Apache Solr and tell you how to configure it properly. In addition, we will also tell you how to index a sample data file using Solr. Apache Solr supports different formats, including various databases as well as PDF, XML or CSV files etc. In this post, we will look at how to index data from an XML file. At the end of the article we will show you how to present your searching results using a web browser.
We leverage a Linux operating system in this article to run the examples (using Solr in a Windows environment shouldn“™t make a big difference whatsoever). One more thing: before you start the Solr installation, make sure that you have installed a JDK 1.6 or above and that the JAVA_HOME environment variable is set properly.
Why use Apache Solr?
Apache Solr is an open source enterprise search server, implemented in Java and thus easy-to-extend and modifiable. It uses the Lucene Java searching library at its core for full-text indexing and search. The server communication uses standard HTTP and XML but also supports REST APIs and JSON. Solr supports both schema and schemaless configuration without Java coding, and it has also a plugin architecture system to support more advanced customization. Apache Solr provides a wide variety of features; we just list some of the most important features here:
- Full-text searching function
- Support of XML, JSON and standard HTTP communication
- Highly scalable and fault tolerant
- Faceted searching and filtering
- Support of many major languages like English, German, Chinese, Japanese, etc.
- Rich document parsing
Solr VS Lucene
Solr and Lucene are not competing; on the contrary, Solr is dependent on Lucene: the core technology of Solr is implemented using Apache Lucene. It is important to note that Solr is not a simple wrapper for Lucene but that the functionality it provides goes far beyond the capabilities that Lucene provides. A simple way to describe the relationship between Solr and Lucene is like a car and the engine. So better we drive a car than just an engine, am I right?
For more details about Lucene please see this blog article from one of my colleagues: Apache Lucene Basics
The homepage for Apache Solr can be found here: http://lucene.apache.org/solr/
Installing Apache Solr
Requirement: Linux or Windows system with JDK 6 or above installed
wget http://mirror.softaculous.com/apache/lucene/solr/6.6.0/solr-6.6.0.tgz
tar -zxvf solr-6.6.0.tgz
cd solr-6.6.0
Architecture of Apache Solr
Once Solr“™s Zip file is downloaded, unzip it into a folder (solr-6.6.0). The extracted folder will look as depicted in the following picture:
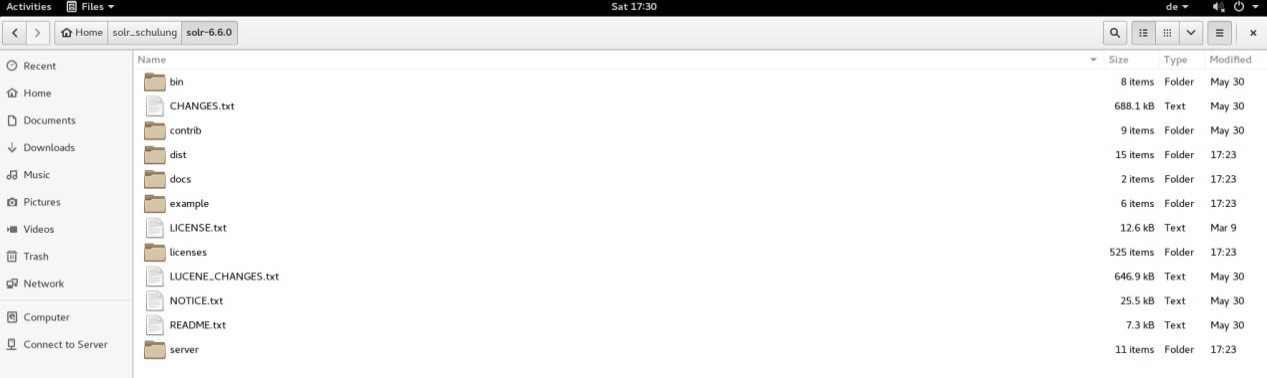
The folder system of Solr is arranged as follows:
- The bin folder contains scripts which are used to start and stop the server; we can also use the command „status„ to check server status.
- The example folder contains several sample files. Some tutorials leverage one of these to show how Solr indexes data. But as we want to create our examples step by step and use curl via HTTP REST service we don“™t use this folder in this article.
- The server folder is the most important folder. It contains the logs folder – all the Solr logs are written into this folder. This will surely help us in checking for any errors during the indexing process. The Solr folder under the server folder contains one sub-folder for each collection or core that is managed by the server. We will go into more detail on those two artefacts later on. The configuration of Core and Collection elements is contained in a file called „managed-schema“, there is one such file for each Core or Collection.
Let us now have a look at the big picture of Solr Architecture
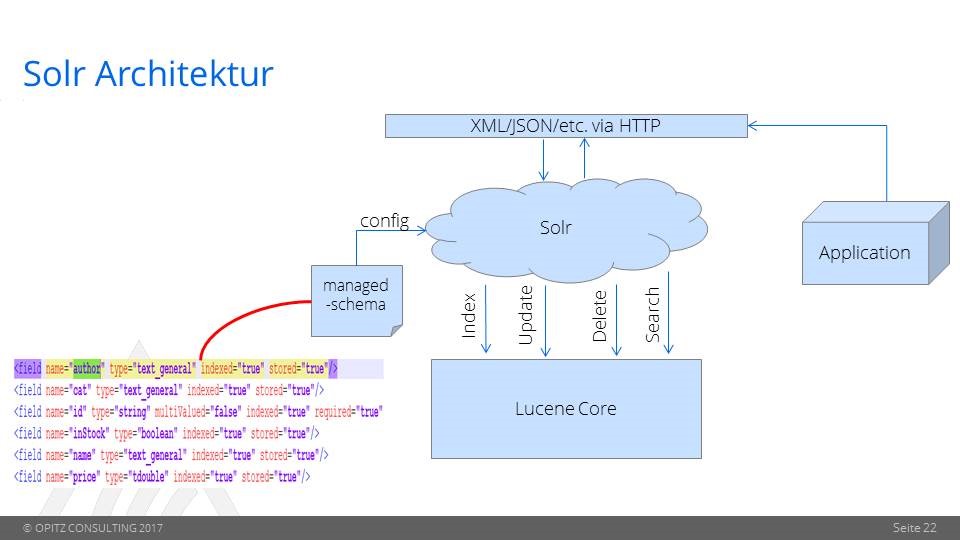
A customer can use REST clients, cURL, wget, Postman, as well as native clients (available for many programming languages) to communicate with Solr. Solr will send the corresponding command to Lucene Core for
- Index
- Update
- Delete
- Search
The managed schema file is used to configure a core or collection.
Let“™s assume the following example: in case we want to analyze log data from an Apache HTTP Server in our Lucene core, first of all we should start the Solr server, create a core in Solr and then add some useful fields to the managed schema file of the core. Those fields could for example include
- Timestamp (as unique key)
- Error_Code
- Error_Message etc.
The next step is to implement an application which sends the log data from the Apache Server to Solr and indexes the documents by using Lucene Core. Once the date has been indexed Solr can be queried (using its REST API for instance).
We will have a more detailed look on the necessary steps in the rest of the article.
Start and stop Solr
Apache Solr has a built-in Jetty Server, and we can use command-line scripts to start the Solr server. Just go to the bin directory under folder solr-6.6.0, and enter the following command into the command window.
solr start
This command will start the Solr server using default port 8983 in our local environment. Now we can open the following URL and validate in the browser that our Solr instance is running.
firefox http://localhost:8983/Solr/
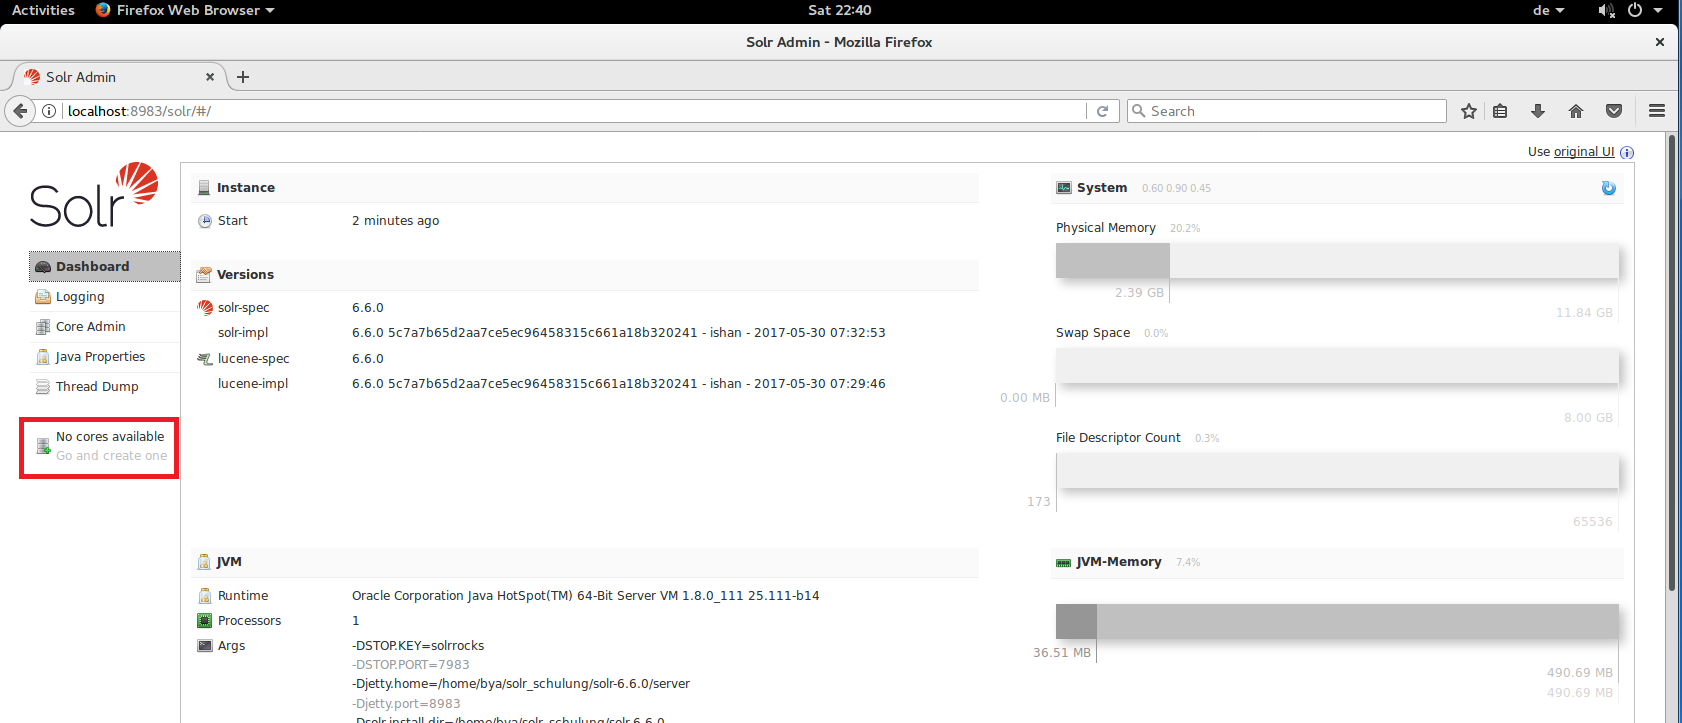
This opens the main page of the Solr admin server. For further information on the admin server please visit https://cwiki.apache.org/confluence/display/solr/Overview+of+the+Solr+Admin+UI. As can be seen in the red box on the left which says „No cores available“ we haven“™t created any cores in our Solr server yet. So our next task is to create a new core.
Checking the server status can be done using the command:
solr status
To stop the server, please use the following command.
solr stop
Create a core
Before we start to create a core, it is mandatory for you to understand the different artefacts (as, for example, „documents“ as a basic unit of information) that Solr is managing.
Please use this link to first understand some basic definitions in Solr: https://cwiki.apache.org/confluence/display/solr/Overview+of+Documents%2C+Fields%2C+and+Schema+Design
Once you have a basic understanding of the Solr definitions we are ready to create our first Core now. Cores and Collections are similar to a table in a relational database „“ whether a Core or a Collection is created depends on whether Solr is running in standalone (Core) or SolrCloud mode (Collection). As we have started the Solr server in standalone mode a few steps before we will be just creating a Core later on. More details on the usage of the SolrCloud will be discussed in one of my next blog posts.
In this article we use XML files containing employee data as an input and want to analyze or query this data using Apache Solr. First of all we must create a core „employeedata“.
Let“™s go to the bin directory under folder solr-6.6.0, and enter the following command in the command window:
solr create -c employeedata
The solr create command detects which mode Solr is running in, and then takes the appropriate action (either creating a Core or a Collection).
For more details and more options please enter this command:
solr create_core -help or solr create_collection -help
We can see the output below in the command window:
Creating new core 'employeedata' using command:
http://localhost:8983/solr/admin/cores?action=CREATE&name=employeedata&instanceDir=employeedata
{
  "responseHeader":{
    "status":0,
    "QTime":822},
  "core":"employeedata"}
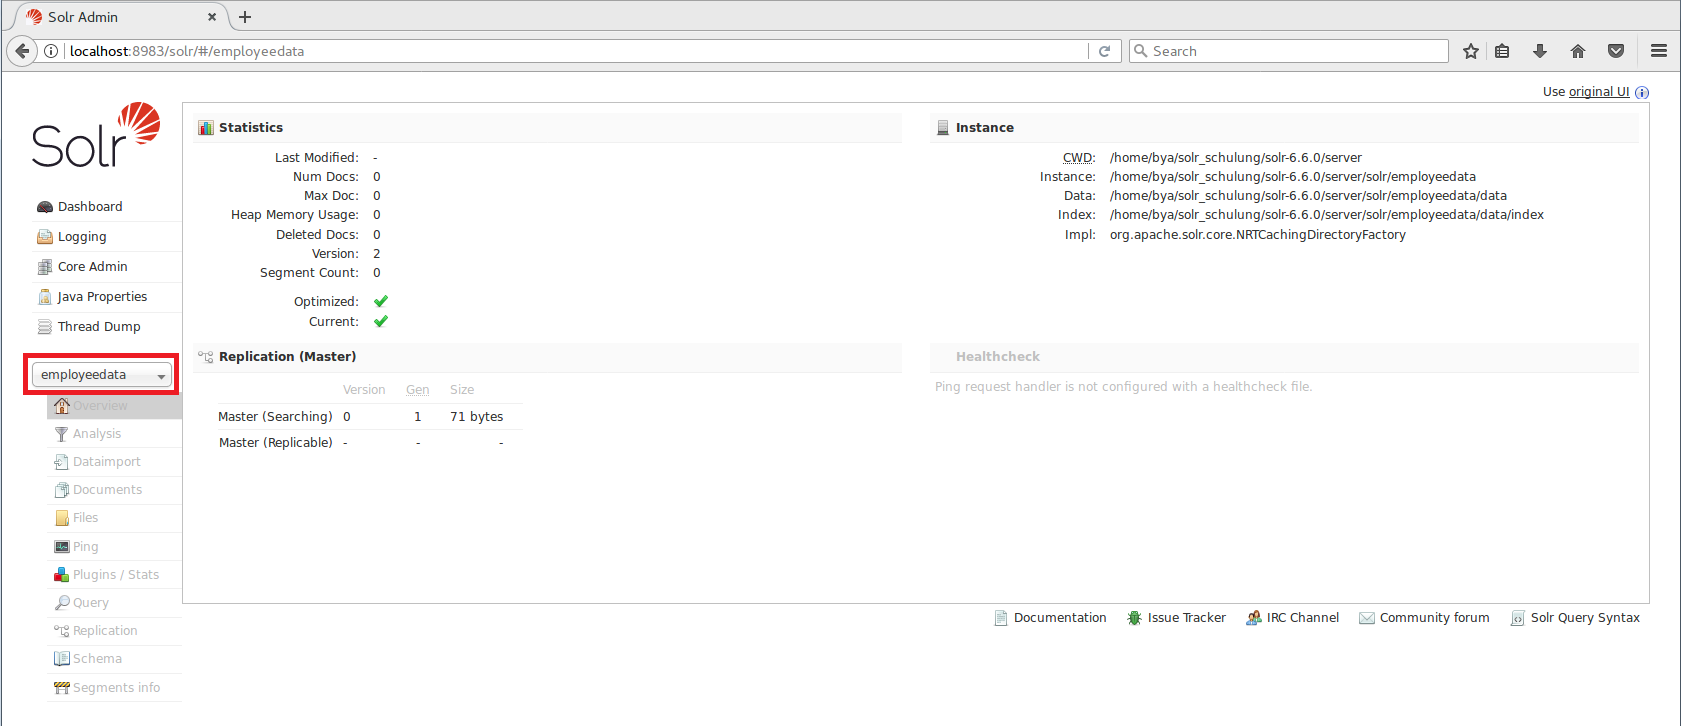
In the Apache Solr admin server we will see that we have one core in the pulldown list at the end of left-side menu now. Clicking on the core name shows additional menus of information for our employee core, such as a Schema Browser, Config Files, Plugins & Statistics, and an ability to perform queries on indexed data.
Modify the managed schema file
The employee data we use in our example looks like the following picture: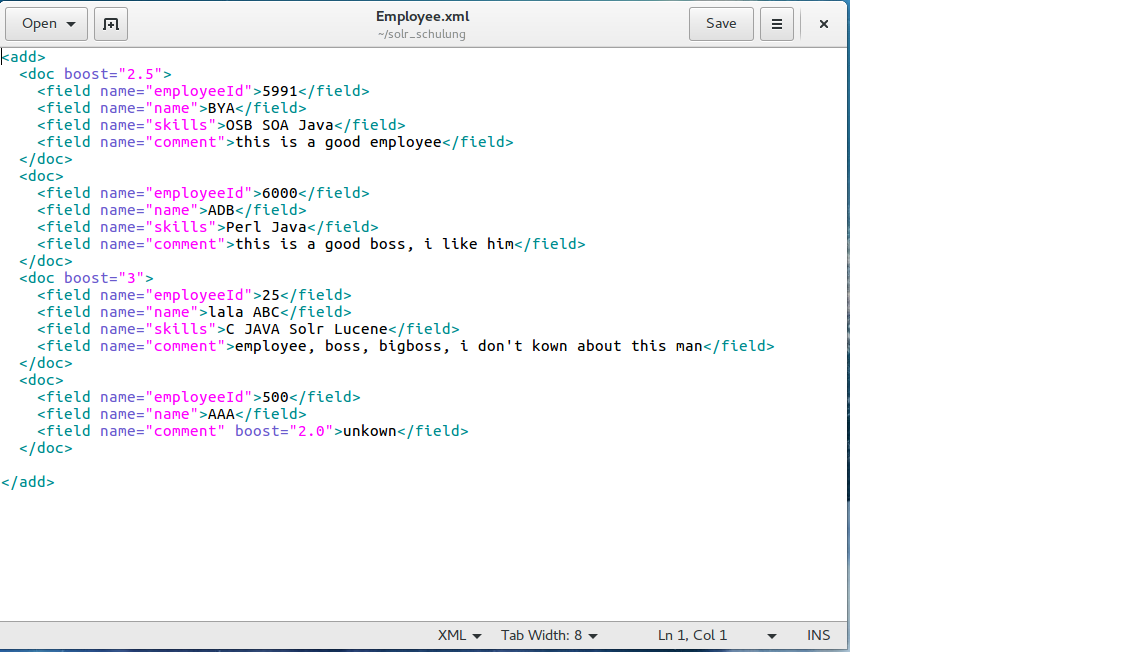
As you noticed in the Employee.xml, the fields employeeId, name, skills and comment should be added to the managed schema file, so that we can add the corresponding data from the document to those fields in the employeedata Core.
If you want, you can check the default schema fields and field types via curl. Make sure that you have already installed curl in your Linux or Windows system.
curl http://localhost:8983/solr/employeedata/schema
curl http://localhost:8983/solr/employeedata/schema/fields
curl http://localhost:8983/solr/employeedata/schema/fieldtypes
The managed schema file can be modified directly in the folder /solr-6.6.0/server/solr/employeedata/conf. Another way to change this file is to use Apache Solr admin server which is also quite simple. In this article, I will introduce a third method „“ using the REST API. Assume we have only remote access to our Solr server; so we can create a local file, which includes what we want to add and to change in the managed schema file and after Creation just send this local file via HTTP POST to the server. The local file looks like in the following picture: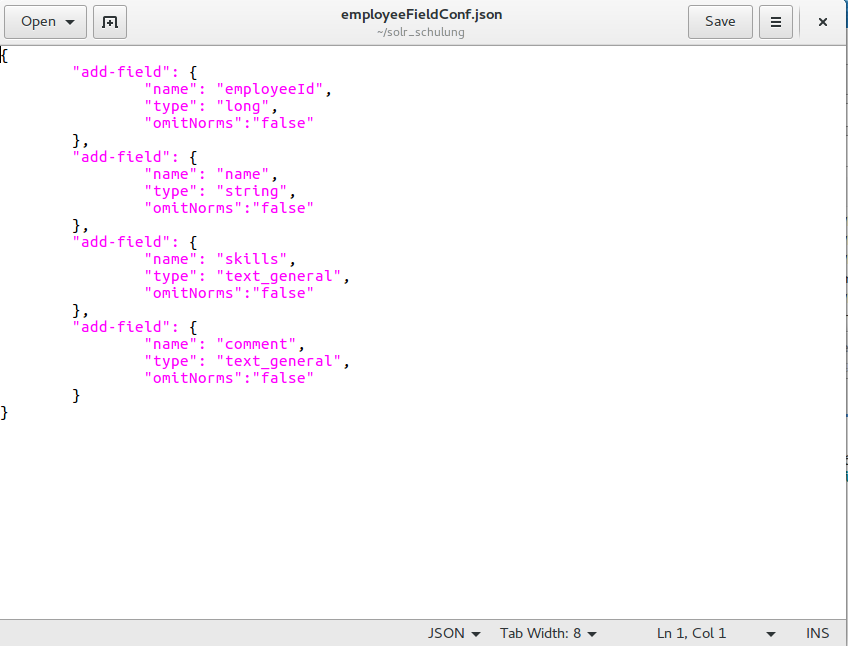
For more details about properties and types in the field please use this link: https://cwiki.apache.org/confluence/display/solr/Field+Type+Definitions+and+Properties
Please then navigate to the employeeFieldConf.json file directory and enter this command in command window:
curl -X POST -H Content-type:application/json http://localhost:8983/solr/employeedata/schema/fields --data-binary @employeeFieldConf.json
After execution of this command, we can check the new fields using the admin server console: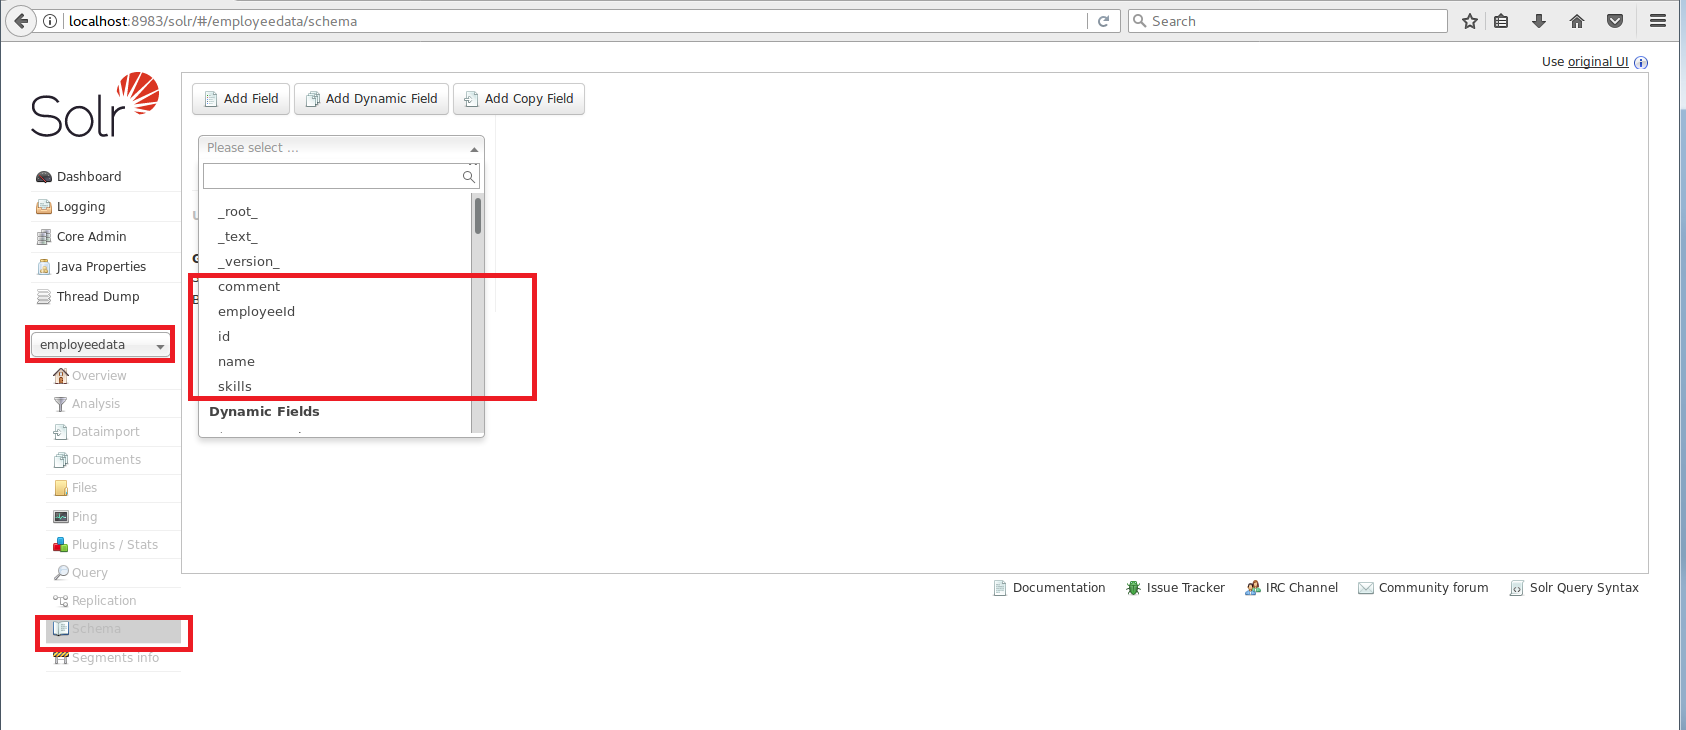
As one can see the fields employeeid, name, skill and comment have been created successfully in the managed schema. Wait! We didn“™t create a field called „id“ in this case. But nonetheless it has obviously been created. Why?
Because every Core must have a unique key, the id is automatically created in the default managed schema file. Of course you can remove this field from the managed schema and change the unique key to another field.
Add documents
Everything is ready now, so we just need to add documents to our core now and index the data in those documents. Note that there are two main ways of adding data to Solr: HTTP GET and using a native client. For this small example we will use curl with HTTP GET. Please navigate to the Employee.xml file directory and enter this command into the command window:
curl -H Content-type:text/xml http://localhost:8983/solr/employeedata/update?commit=true --data-binary @Employee.xml
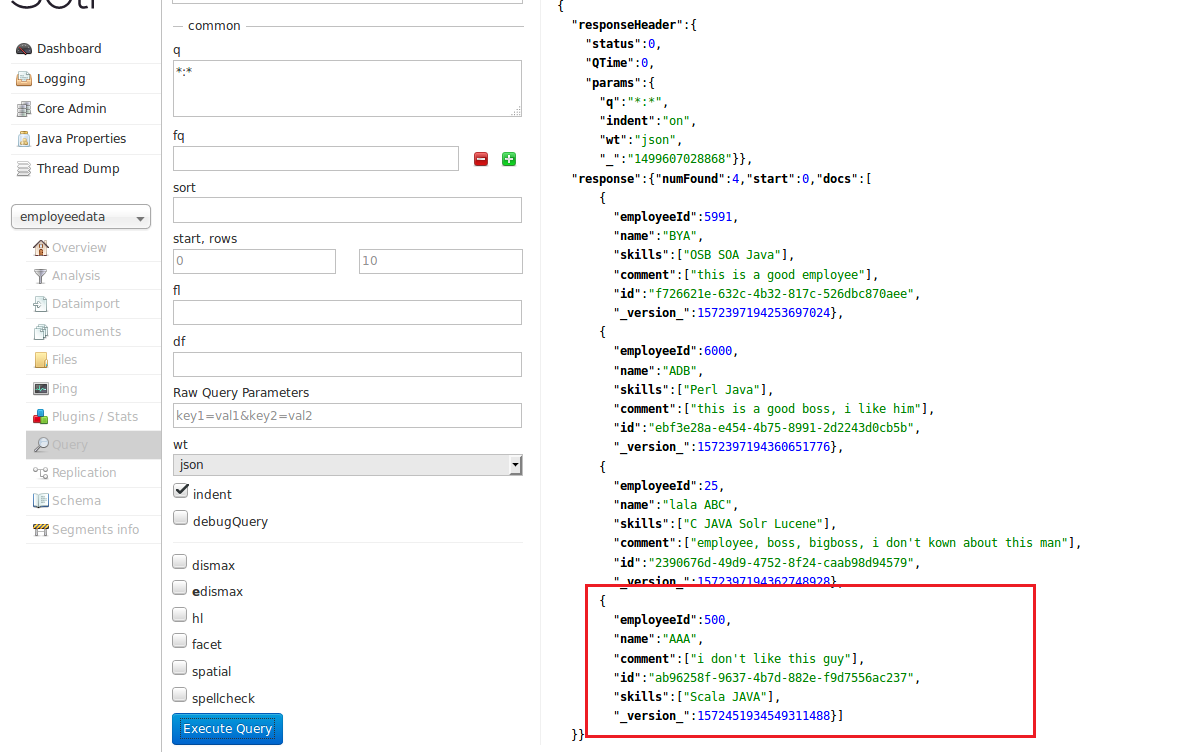
The content type used in this example is text/xml. For Json objects, we need to change the content type to application/json. Now we can check our core in admin server again, the new 4 documents have been already inserted und indexed.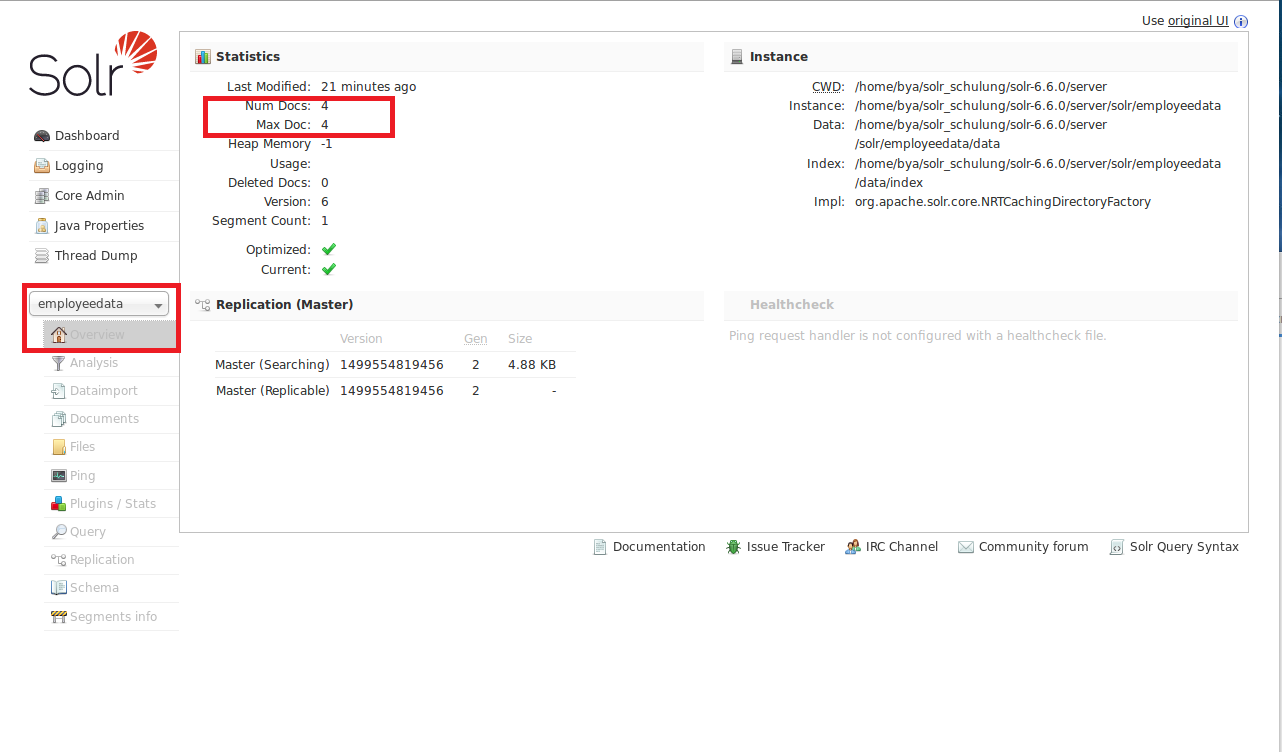
Searching data
Now the documents have already been indexed and we can perform some queries on them. Apache Solr provides a REST API to access data and also provides different parameters to retrieve data. That means: for querying data we use HTTP GET by building a URL that includes the query parameters. For example: the following query shows all documents with field name equal „BYA“.
http://localhost:8983/solr/employeedata/select?q=name:BYA
The output will be shown as below: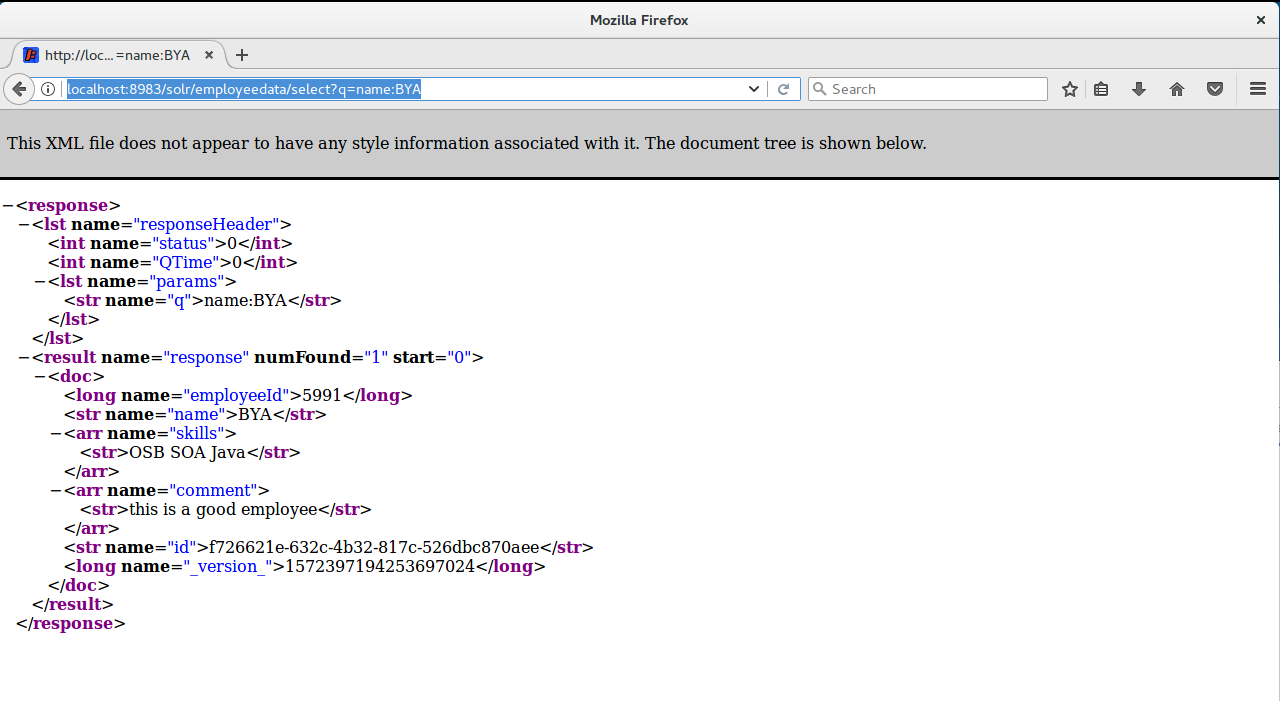
The response contains two parts: a response header and the response in XML format. The response header shows some status and query information, and the results are shown in the response part. Please also notice how to create a query URL. This URL includes hostname, port, application name, core name and query parameter q (query: name=BYA). We can also use wildcards, the filter query parameter „fq“ etc. Please try some of the commands below by yourself and see the results in the web browser. Are the running results just like what you were expecting?
http://localhost:8983/solr/employeedata/select?fq=employeeId:[0 TO 30]&q=*:*
http://localhost:8983/solr/employeedata/select?fq=employeeId:[0 TO 5999]&indent=on&q=skills:Java&wt=json
http://localhost:8983/solr/employeedata/select?fq=employeeId:[0 TO 5999]&indent=on&q=(skills:Java) AND (comment:big*)&wt=json
Updating documents
Please see this example below first: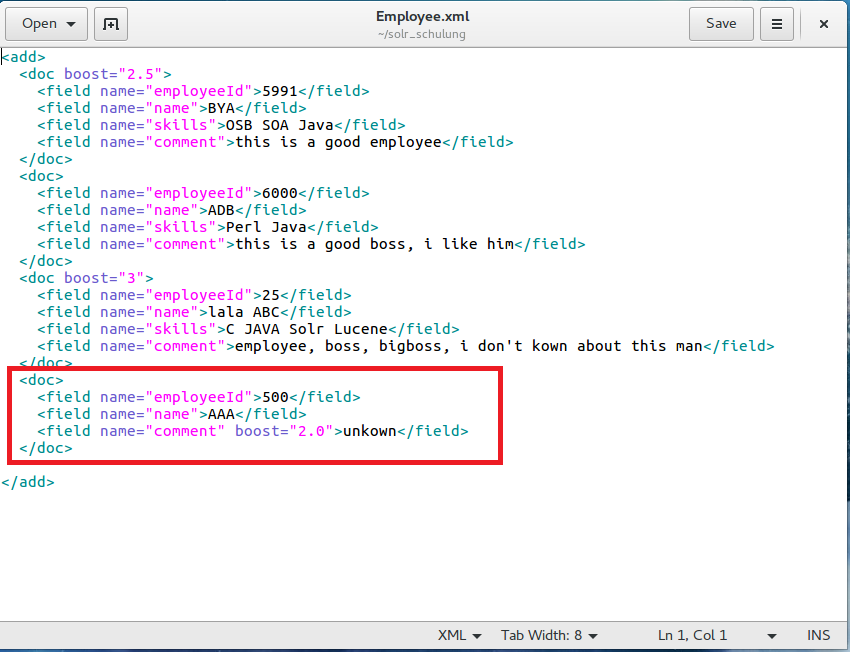
As you noticed, the last employee in our document has no skill data, therefore we want to add a new „skills“ field to this employee, and in addition we also want to modify the comment, as we want to get rid of the typo. Additionally, „unknown“ is not a very good comment regarding an employee in the company. So how can we achieve that? We will use the same approach like adding documents to Apache Solr.
First we create an updating data file in our local system, the example will be shown as below: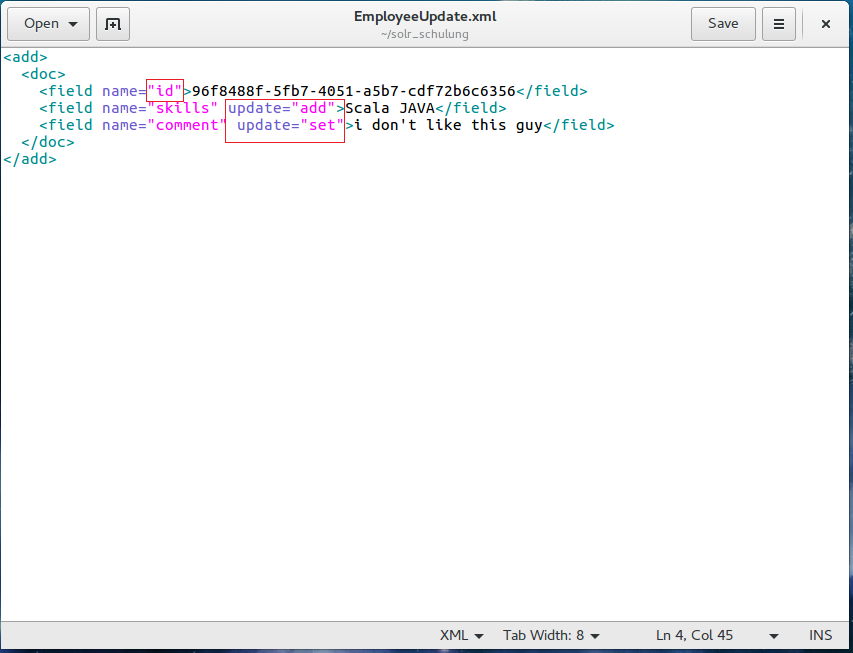
We should talk about some aspects of this XML file. The most important point is that you can only update an existing file with a unique key; in this example the key is stored to the „id“ field, as this field has been defined to contain the unique key.
Second, if you want to add a new field to a document, you must set attribute update=“add“, in opposite if you need modify an existing field, then you just set attribute update=“set“.
Once the file is created we can send it via HTTP GET to Apache Solr server by using this command under the EmployeeUpdate.xml file directory.
curl -H Content-type:text/xml http://localhost:8983/solr/employeedata/update?commit=true --data-binary @EmployeeUpdate.xml
The output will be shown as below:
For more details, options and attributes by updating file please see this link: https://wiki.apache.org/solr/UpdateXmlMessages#add.2Freplace_documents
Delete document and core
The difference between deleting documents and updating documents is that you can remove documents by using a query clause. That means you can also delete a document with normal fields. The unique key is not necessary in this situation. Once again we use curl via HTTP GET to send our command. The first command is used to delete one document with name „BYA“, the second command is used to delete all documents in the employeedata Core.
curl http://localhost:8983/solr/employeedata/update?commit=true -H Content-type:text/xml --data-binary 'name:BYA'
curl http://localhost:8983/solr/employeedata/update?commit=true -H Content-type:text/xml --data-binary '*:*'
In Order to remove a Core, we can run a command with curl or we can delete the Core by using a script in the bin folder.
solr delete -c employeedata
curl http://localhost:8983/solr/admin/cores?action=UNLOAD&core=employeedata&deleteIndex=true&deleteDataDir=true&deleteInstanceDir=true
Scoring and Boosting
Assume that we found four documents as the result using the query. Which document should be placed on top of the result list? How does Solr rank documents and how can we tune the way Solr ranks and returns search results? To answer that question we need to understand the scoring system as well as the boosting system in Solr. Solr uses the Lucene Java search library at its core. Therefore we must understand the Lucene scoring system. But this is quite complex, so in this article I don“™t want to go into more detail. If you want to know more about Lucene scoring system, please use this link: https://lucene.apache.org/core/2_9_4/scoring.html. There will be another article explaining the Lucene scoring system in detail coming soon.
The boosting system is more interesting as far as Apache Solr is concerned. In order to change the rank, the primary method of modifying document scores is by boosting. There are two ways to change the rank in Apache Solr: Index-time boost and Query-time boost.
- Index-time: boosts are set during configuration our add document file. We can set boost at document level or at field level. We will see an example later.
- Query-time: boosts are added in the query; you can give different weight with search words in the query.
Let us see an example for Index-time: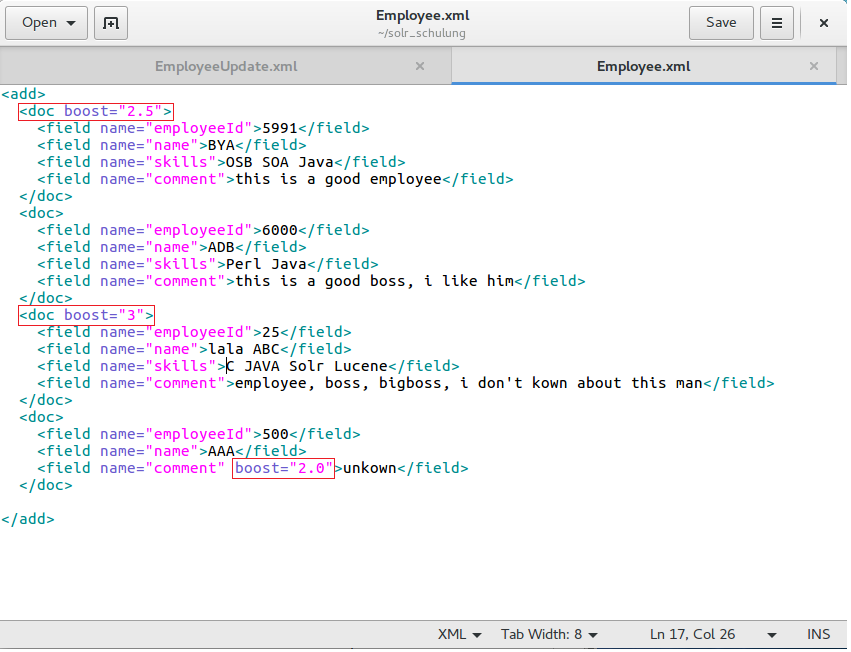
We have already seen this file before and used it to add documents to the Apache Solr server. The first and second red boxes are document level boosts settings. The whole document should be weighted in the system. The bigger the number, the higher the document appears on the rank. The last red box is the field level boost setting. That means: only this field“™s „comment“ is weighted for this document.
Query-time boosting:
An example: we want to know, which employees have skill c or skill Perl, the result will be shown as below: The important point is that we use the logical function „or“ in this query URL. The result shows us that the employee „lala“ is placed at top and then employee ADB comes in second place. But unfortunately we need a Perl skill employee immediately. That means we should search also skill „C“ and skill „Perl“. But skill „Perl“ is more important than skill „C“. How can we do that in Solr.
In query clauses we can use caret character ^ followed by a positive number as query boost to weight an important word.
http://localhost:8983/solr/employeedata/select?indent=on&q=skills:C or (skills:Perl)^10&wt=json
So run this URL again in a web browser. You will see the other result below: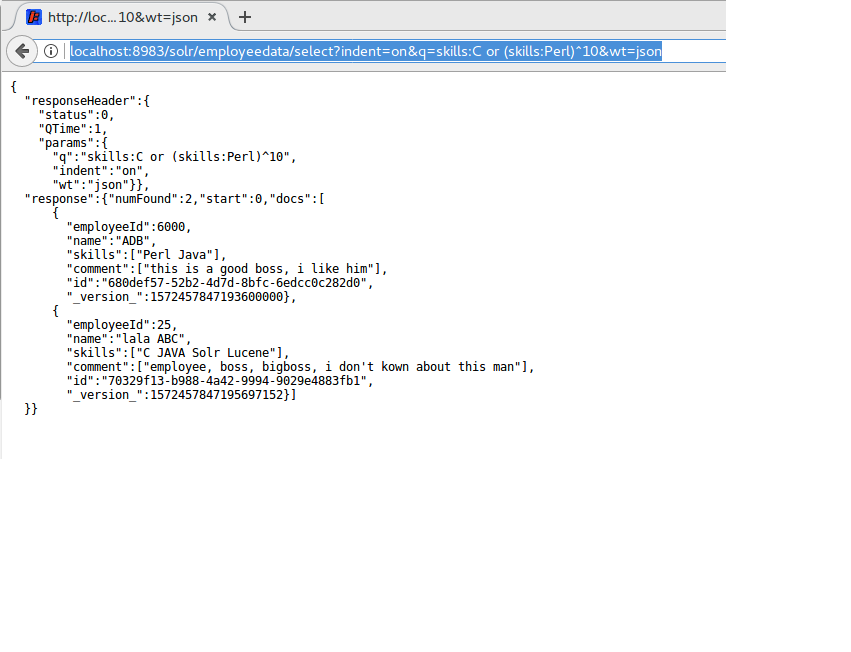 As we saw, the rank is just in the reverse. Solr doesn“™t allow negative boots, so if you want to add some negative weight in your query clause, please use negative field install negative boots. For example: (-skills:Perl)^2.
Query-time boosting via function:
In addition Solr providers many functions to add boosting in query, if you want to know more about the list of functions and the usage of those functions, please use this link: https://wiki.apache.org/solr/FunctionQuery
Conclusion
That“™s it.
This article describe only the basis of Solr and I wish this article can bring you nearly to the Apache Solr world and hope you have a good time during travelling this world.
.


1 Kommentar
Abundância de Janeiro: CEPESC/CLAM, 2006. http://mtvkenya.com/trump-issues-executive-order-to-start-rolling-back-obamacare/