
In this blog post I will describe how to implement a user profile picture functionality in ORACLE’s ADF 12c. In this case we have a existing ADF application with login functionality which is able to differentiate the current user.

The article cotains a part wichs describes how to create a mapping between a HTTP Servlet and adfBindings.
This part is based on an article from Timo Hahn. You can find it here
JDev11.1.2.1.0: Handling images/files in ADF
in section ‚2. Using the existing BindingLayer of the application‘.
Creating a database table with blob attribute and the matching Entity Object in your ADF application:
The first thing to do is to create a database entity with an attribute to save the profile picture (In this case we use a ORACLE 12c database). The data type of the database attribute should be BLOB. For example you can see our employee table here 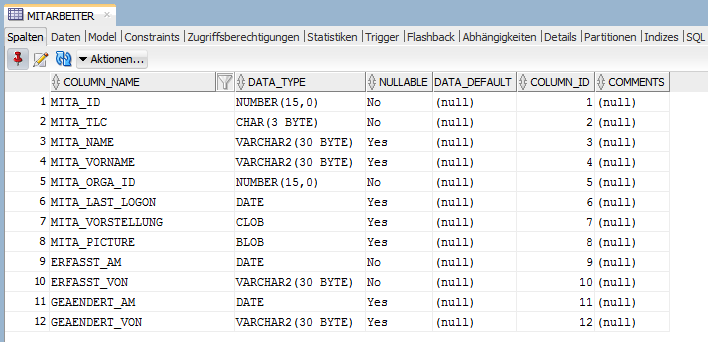
After creating the database entity you have to create a Entity Object in your ADF application which represents your new table. For example: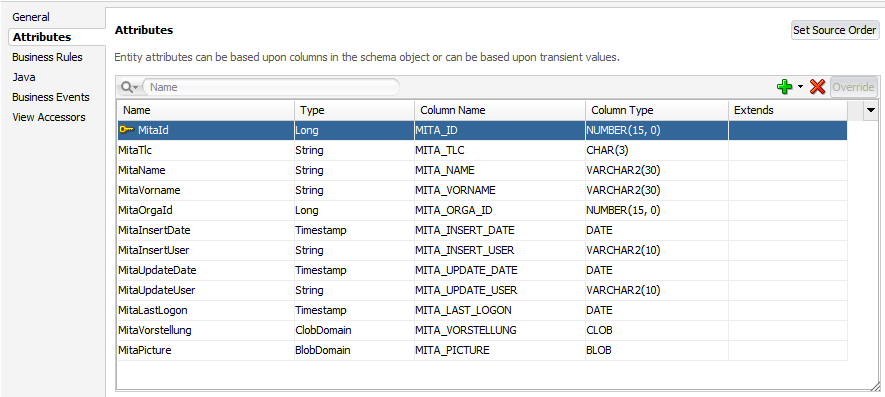
Creating the HTTPServlet to load the currents user profile picture:
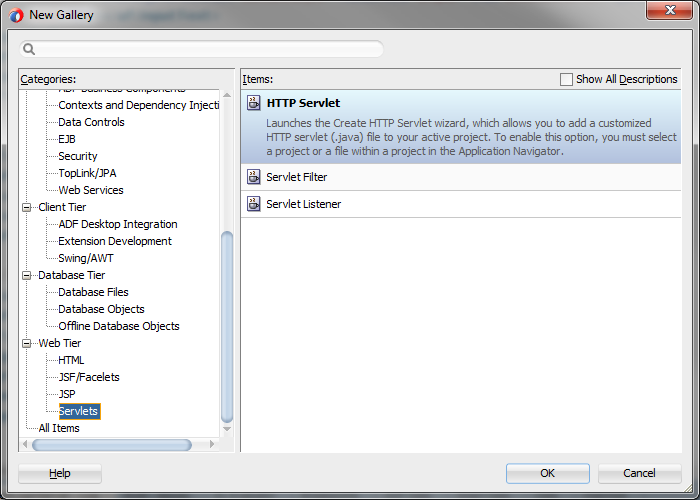
- open your ViewControllers context menu and select ‚New -> From Gallery -> Servlets -> HTTP Servlet‘

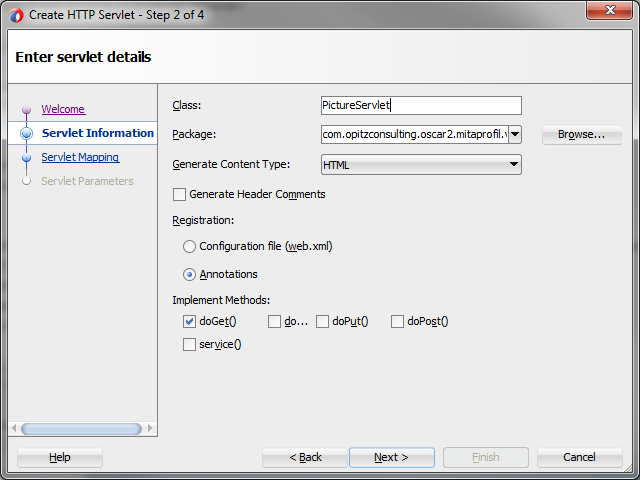
- give your servlet a meaningful name for example ‚ProfilePictureServlet‘

- click Next and then Finish in the ‚Create HTTP Servlet‘ wizard
- now copy & paste the following code to your new created servlet (ProfilePictureServlet.java)[code language=“java“]package com.opitzconsulting.oscar2.mitaprofil.view;
import java.io.BufferedInputStream;
import java.io.IOException;
import java.io.OutputStream;
import java.sql.Blob;
import java.sql.Connection;
import java.sql.PreparedStatement;
import java.sql.ResultSet;
import java.sql.SQLException;
import javax.naming.Context;
import javax.naming.InitialContext;
import javax.servlet.ServletConfig;
import javax.servlet.ServletException;
import javax.servlet.annotation.WebServlet;
import javax.servlet.http.HttpServlet;
import javax.servlet.http.HttpServletRequest;
import javax.servlet.http.HttpServletResponse;
import oracle.adf.model.BindingContext;
import oracle.adf.model.binding.DCBindingContainer;
import oracle.jbo.uicli.binding.JUCtrlActionBinding;
@WebServlet(name = „MitaPictureServlet“, urlPatterns = { „/mitapictureservlet“ })
public class MitaPictureServlet extends HttpServlet {
private static final String CONTENT_TYPE = „image/gif; charset=UTF-8“;
public void init(ServletConfig config) throws ServletException {
super.init(config);
}
public void doGet(HttpServletRequest request, HttpServletResponse response) throws ServletException, IOException {
response.setContentType(CONTENT_TYPE);
String imageId = request.getParameter(„mita_id“);
OutputStream os = response.getOutputStream();
Connection conn = null;
try {
Context ctx = new InitialContext();/* Here we access the custom created PageDef which was created for the servlet, to execute the methodAction which calls the ClientInterfaceMethod getCurrentConnection.
This allows us to use the current existing database connection, to get the uploaded profile picture of the current user.*/
BindingContext bCtx = BindingContext.getCurrent();
DCBindingContainer amx =
bCtx.findBindingContainer(„com_opitzconsulting_oscar2_mitaprofil_view_pageDefs_MitaPictureServletPageDef“);
JUCtrlActionBinding lBinding = (JUCtrlActionBinding) amx.findCtrlBinding(„getCurrentConnection“);
lBinding.invoke();
conn = (Connection) lBinding.getResult();
PreparedStatement statement =
conn.prepareStatement(„SELECT mita_id, mita_picture “ + „FROM mitarbeiter “ + „WHERE mita_id = ?“);
statement.setInt(1, new Integer(imageId));
ResultSet rs = statement.executeQuery();
if (rs.next()) {
Blob blob = rs.getBlob(„MITA_PICTURE“);
BufferedInputStream in = new BufferedInputStream(blob.getBinaryStream());
int b;
byte[] buffer = new byte[10240];
while ((b = in.read(buffer, 0, 10240)) != -1) {
os.write(buffer, 0, b);
}
os.close();
}
} catch (Exception e) {
System.out.println(e);
} finally {
try {
if (conn != null) {
conn.close();
}
} catch (SQLException sqle) {
System.out.println(„SQLException error“);
}
}
}
}[/code]
Add the necessary ADF components for a image upload to your page:
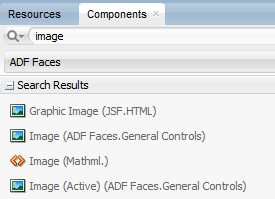
- add an af:image component from the component palette
- change the source attribute of your af:image component to point to the profile picture which is served from the HTTP Servlet. The image source should look something like this ‚ /[urlPatterns]?[current_user_id]=#{EmpBean.emp_id} ‚
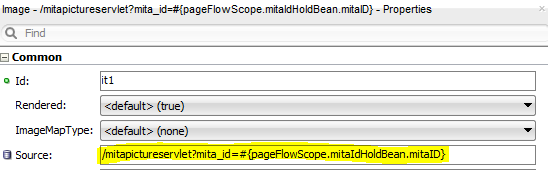
Note: the ‚current_user_id‘ in the af:image source is the id of the currently logged in user. Later in the HTTP Serlvet we use that parameter to determine which picture to load from database. You can see how to access that value in line 29 of the HTTP Serlvet code. - add an af:inputFile from component palette which will allows the user to select an image from the hard drive
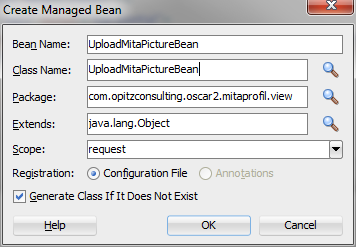
- now press the blue gear-symbol from the af:inputFile Binding property to start the ‚Create Managed Bean‘ wizard and create a new managed bean (this step is only to generate a Java bean to implement the image upload functionality later)
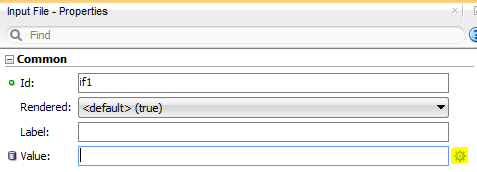
- set the property Value for the af:inputFile to point to a property/variable in the before created managed bean. For example ‚imageToUpload‘. Important is now to change the type of the bean variable to ‚UploadedFile‘ for example: ‚private UploadedFile imageToUpload;‘
- implement the following methods to make the image upload possible[code language=“java“]public void uploadPic(ValueChangeEvent valueChangeEvent) {
// set the value for the new choosed picture
setUploadPicture((UploadedFile) valueChangeEvent.getNewValue());
UploadedFile uploadedFile = (UploadedFile) this.getUploadPicture();
BindingContext bindingctx = BindingContext.getCurrent();
BindingContainer bindings = bindingctx.getCurrentBindingsEntry();
DCBindingContainer bindingsImpl = (DCBindingContainer) bindings;
DCIteratorBinding iter = bindingsImpl.findIteratorBinding(„Mitarbeiter1Iterator“);
Row row = iter.getCurrentRow();
// set the database attribute MitaPicture (you can look up the attribute name in the EO) of the employees iterator to the selected profile picture
row.setAttribute(„MitaPicture“, createBlobDomain(uploadedFile));
ADFUtils.handleNavigation(„doCommit“);
ADFUtils.refreshWholePage();
}
private BlobDomain createBlobDomain(UploadedFile file) {
InputStream in = null;
BlobDomain blobDomain = null;
OutputStream out = null;
try {
in = file.getInputStream();
blobDomain = new BlobDomain();
out = blobDomain.getBinaryOutputStream();
byte[] buffer = new byte[8192];
int bytesRead = 0;
while ((bytesRead = in.read(buffer, 0, 8192)) != -1) {
out.write(buffer, 0, bytesRead);
}
in.close();
} catch (IOException e) {
e.printStackTrace();
} catch (SQLException e) {
e.fillInStackTrace();
}
return blobDomain;
}[/code] - don’t forget to remove the Binding property from the af:inputFile, instead you choose it as the Value property

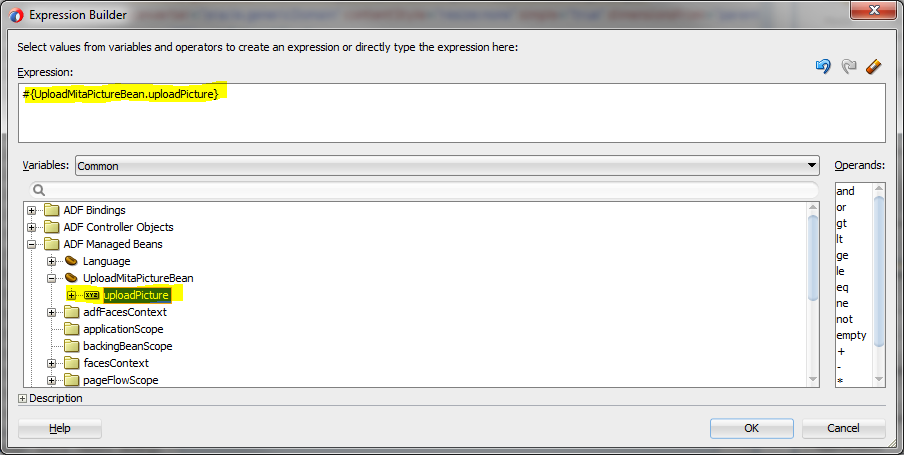
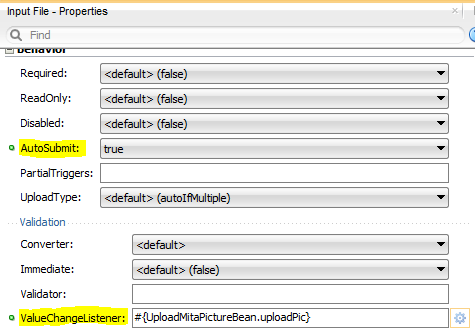
- set the AutoSubmit property to true and point the ValueChangeListener property from the af:inputFile to your method which uploads the image. For example ‚#{UploadMitaPictureBean.uploadPic}‘. (We do this to upload the selected image right after the user choosing it from the hard drive, so it is not necessary to select an image an press an extra upload button or something like that.)


Create a ClientInterfaceMethod to use a existing database connection to select the current users profile picture:
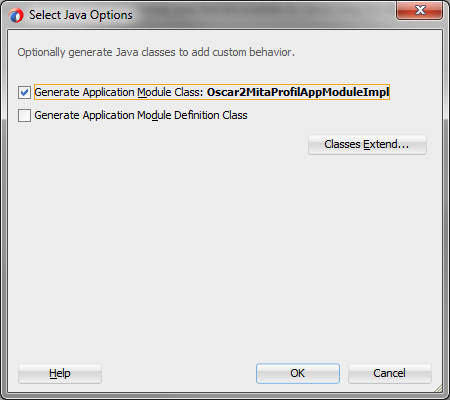
In our case we already have a database connection in our application, so we don’t want to create a new connection. To accomplish this, we create a ClientInterfaceMethod in the ApplicationModuleImpl Java class to receive our current existing connection.
- open your ApplicationModule, open the Java tab and press the edit-pencil-symbol in the right upper corner to generate the ApplicationModuleImpl
- open the generated ApplicationModuleImpl class and implement a method like[code language=“java“]/**
* gets the current existing database connection
* @return Connection-Object
*/
public Connection getCurrentConnection() {
Statement st = null;
try {
st = getDBTransaction().createStatement(0);
return st.getConnection();
} catch (SQLException s) {
s.printStackTrace();
return null;
} finally {
if (st != null)
try {
st.close();
} catch (SQLException s2) {
}
}
}[/code]this method can be accessed later from the HTTP Servlet to get the current connection.
- add your new created method as client interface method to the ApplicationModule
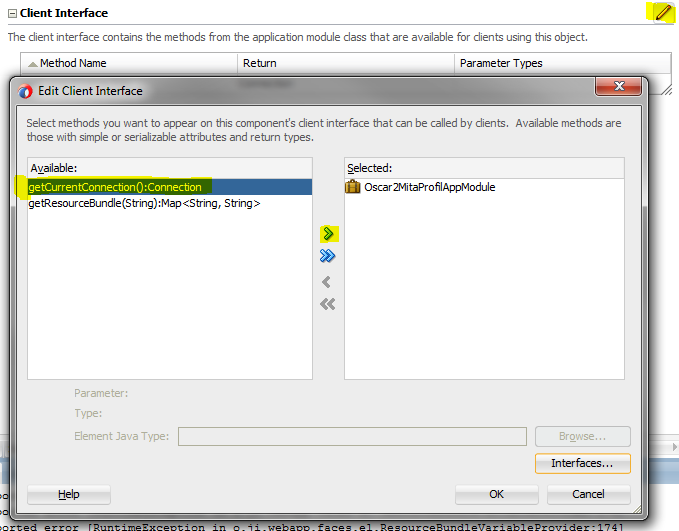
- to make the client interface method accessible, we need to make another step, we have to create a PageDef for the HTTP Servlet now which registers the client interface method as a ‚methodAction‘
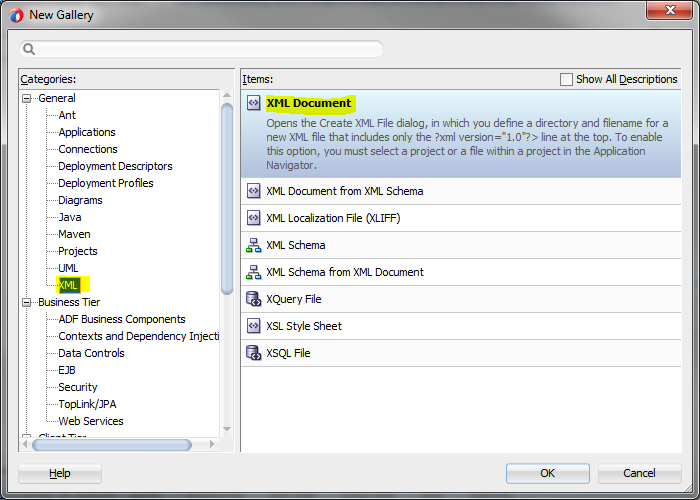
(implemented like Timo Hahn describes in his article…)- create a new XML File via New -> From Gallery…“ and save it to your ‚pageDefs‘ package
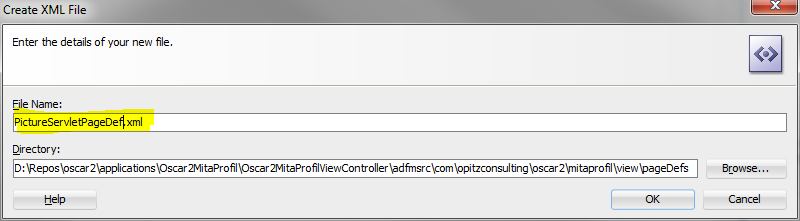
- for the JDeveloper it’s not an PageDef file yet, so you have to copy the source from any other of your PageDef files to the new created XML-File, save and restart the JDeveloper. Now it’s recognized as a PageDef. Further you have to change the id attribute in the PageDef to the name of your XML-Document. Like this[code language=“xml“]
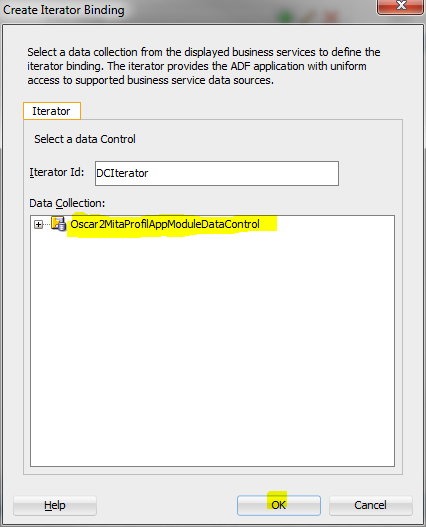
- switch to the Overview-Tab of the PageDef, press the green plus-symbol in the Executables section and select iterator to create a DataControl Binding. This is necessary to get access to the client interface method ‚getCurrentConnection‘
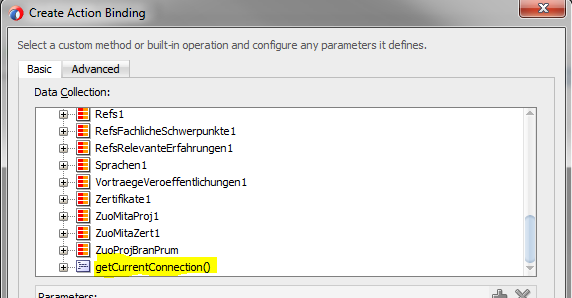
- now we can create the methodAction binding. To do that press the green plus-symbol, choose ‚Binding‘ and then ‚methodAction‘
- in the now opened ‚Create Action Binding‘ wizard search for the client interface method and add it
- the next step is to register the new created HTTP Servlet PageDef in our DataBindings. Open the DataBindings.cpx file and select a random entry under ‚Page Definition Usages‘. Now look at the structure window (by default down left), right click ‚pageDefinitionUsages‘ and select ‚Insert Inside pageDefinitionUsages‘
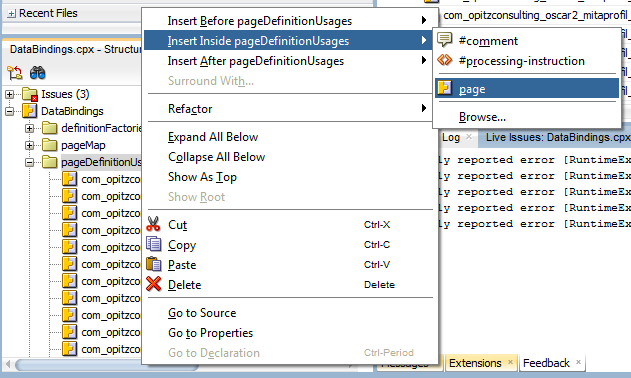
- in the following popup we have to enter the id and the path like this

- the previous steps allow the HTTP Servlet to use the methodAction binding and so the client interface method getCurrentConnection
- create a new XML File via New -> From Gallery…“ and save it to your ‚pageDefs‘ package


Register the HTTP Servlet in the application and allow a file upload:
- open the web.xml file in Web Content -> WEB-INF
- press the green plus-symbol in the Servlets-Tab to register the HTTP Servlet
- now change to the Filters-Tab on the left, choose the entry adfBindings from the table and select the tab Filter Mappings under the table
- create a new Filter Mappings entry with the green plus-symbol, set ‚Mapping Type‘ to Servlet, select the created servlet as ‚Mapping‘ and choose FORWARD & REQUEST as ‚Dispatcher Type‘

- the final important step is to allow the file upload for users, to do this we open the .jsf or .jspx page which contains the file upload component (af:inputFile)
- now set the property ‚UsesUpload‘ to true
IMPORTANT:
- if you have multiple hierarchical pages, it’s necessary to set the ‚UsesUpload‘ property to true on all overlying pages
- if you have ADF libraries from other ADF applications in your application, it’s necessary to make the web.xml configuration for the HTTP Servlet, too


